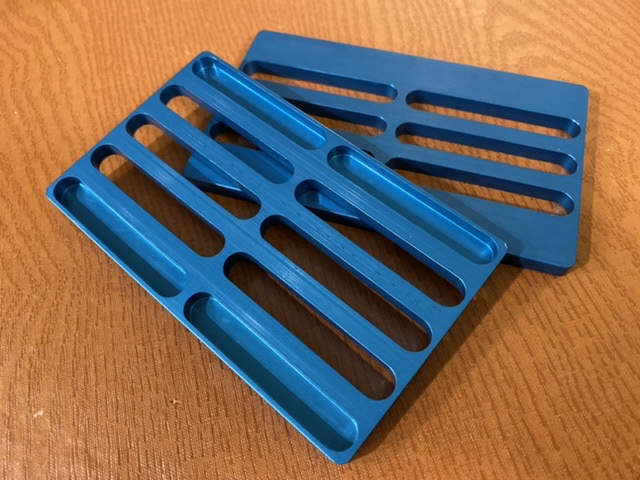
These “Blue Plates” are riser plates, each 1/4” thick, that fit between your Steadicam’s dovetail plate and the camera you’re mounting. The plates are incredibly useful for balancing a Wave horizon stabilizer to get the camera’s vertical center of gravity to be at the center of the Wave’s rotation (critical if you want to be able to operate precisely with the Wave), but were originally invented to raise problematic cameras – like Alexa Mini builds without BPA-4 plates – to clear your dovetail, or allow for the height of lens supports to clear your dovetail. The plates weigh only 0.15 pounds (68 grams), so they’re light enough to be used without worry!
I’ve found these plates to be fantastic problem solvers on set and in camera checkouts, and I’m now able to share them with other operators.
Price of $250 includes 2 plates, and 2 boxes of extra-long socket head 3/8” camera screws, 10 total (so you have plenty of spares!). Price also includes free USPS flat rate shipping in the United States. For international shipping, please contact me at tom.wills.soc@gmail.com for a custom quote, as prices vary wildly.
Instructions for use (and balancing the Wave):
- Prep the camera build. Remove any large dovetail bases, try to get the build to be as symmetrical as possible. No need to make the camera super short, so keeping something like a rod baseplate on the base of the camera is okay, as long as it’s not a large “ARRI Dovetail” type of rod bracket – those are generally too tall!
- Assess the build – is there a lot of gack on the top handle, like an MDR and a light ranger? Is the camera pretty low and sleek? If a lot of accessories are on the top, I’d start with one or no Blue Plates. If it’s a more streamlined camera build, I’d start with one or two. As you use the plates more, you’ll develop a sense for how many you may need.
- Mount the Blue Plate(s) (if needed) between the dovetail and the camera base with the appropriate screws.
- Pop the camera/dovetail/blue plate assembly into the Wave. Remove the power cable from the Wave (or keep your sled turned off), and unlock the Wave.
- The camera should sit relatively level. If it falls to either side, it is side-heavy, and you should correct any significant side heaviness before proceeding. This can be done by moving accessories around, or by using a counterweight on a Noga arm, for small differences.
- Once it sits relatively level, now rotate the camera slightly to one side. It will either fall further off level, return to level, or stay there.
- If it returns to level, the camera is bottom-heavy. You need to move weight upwards, either by moving accessories, moving a counterweight, or adding (or doubling up on) a Blue Plate.
- If it falls further off level, it is top heavy, and you’ve overshot. Either move accessories, move a counterweight, or remove a Blue Plate.
- If it stays where you put it, it is balanced.
- Repeat this check across the range. The Wave’s drive has some friction to it, so sometimes it performs differently at different points in its rotational travel. If it’s balanced perfectly, it’ll stay exactly where it’s put at any angle. The Wave will perform well even if slightly out of balance, but the more bottom heavy a build is, the more “squirrely” your sled will behave, and the more side heavy the build is the more the motor will work, which isn’t good for it. So, no need to obsess and get it perfect if you’re in a rush, but it’s good to get as close as you can.